
Migrating a Rails App from Sprockets to JS Bundling with esbuild

At FastRuby.io, we spend a lot of time upgrading Ruby and Rails applications. However, we do more than just that, we also pay attention to other areas of the application that can be improved. For example, we recently migrated a customer’s application from Sprockets to JS bundling with esbuild .
In this article, I share my experience migrating from Sprockets to JS Bundling (JavaScript Bundling for Rails).
This is not a step-by-step guide, as each application has its own unique needs. Instead, I discuss the problems I encountered and the approach I took during the migration to JavaScript bundling.
Why We Needed to Migrate
Before we discuss why we needed to migrate, let me give you some insights into the state of the application. The application had .js
files, .es6 files, jquery, bootstrap.js, and a few other 3rd party JS plugins loaded via CDNs.
The Gemfile also had jquery-rails, coffee-rails, babel-transpiler, terser gems in it. The application was using Sprockets for
asset management. All of these factors indicated that the JavaScript assets had not been updated in a while, and there was some confusion about the internal best practices for writing JavaScript:
- “Should the code be in
.jsfiles?” - “Should the code be in
.es6files?” - “Should they continue adding more inline JavaScript code?”
Also, I knew, in the future, the client wanted to start using Stimulus .
Considering the existing state of JS asset management and the future needs, the best course forward was to migrate from Sprockets to JS bundling. JS bundling along with esbuild as the bundler supported all existing features that the application utilized, so the developers did not face a huge learning curve, and it also gave access to features like tree shaking, instant reloads, and extremely fast bundling, elevating the overall developer experience.
Planning the Migration Strategy
When we began planning our migration from Sprockets to jsbundling-rails + esbuild, we knew that migrating our substantial
JavaScript codebase across a production Rails application required careful orchestration.
The application presented unique challenges:
- Numerous Stimulus-like controllers using
.es6extensions - A large
application.jsfile filled with global functions - Complex jQuery and Bootstrap 2 dependencies
- A Docker-based development environment that needed seamless build integration
Rather than attempting a risky “big bang” rewrite, we developed a three-phase strategy that would allow us to validate each step.
Our approach centered on creating parallel asset pipelines, keeping the existing Sprockets system running while building and testing the new esbuild setup alongside it.
This meant we could migrate incrementally, test thoroughly at each phase. We also front-loaded the infrastructure work, setting up our npm dependencies, Docker build processes, and development workflows before touching a single JavaScript file.
Critical Distinction: Testing vs Merging Strategy
While we tested incrementally after every step, we were careful not to deploy partial work to production. Our strategy was:
- Test incrementally: Validate functionality after each small change (file migration, dependency addition, configuration update)
- Commit to feature branch: We kept committing changes and merging to our base pull request throughout the process
- Merge to main only at the end: The feature branch was merged to main only when the entire migration was complete and all cleanup was done
This approach prevented deploying half-finished migrations to production while still allowing us to track progress and collaborate on the feature branch. The parallel asset pipeline setup allowed continuous testing and incremental commits without risk of breaking the production application.
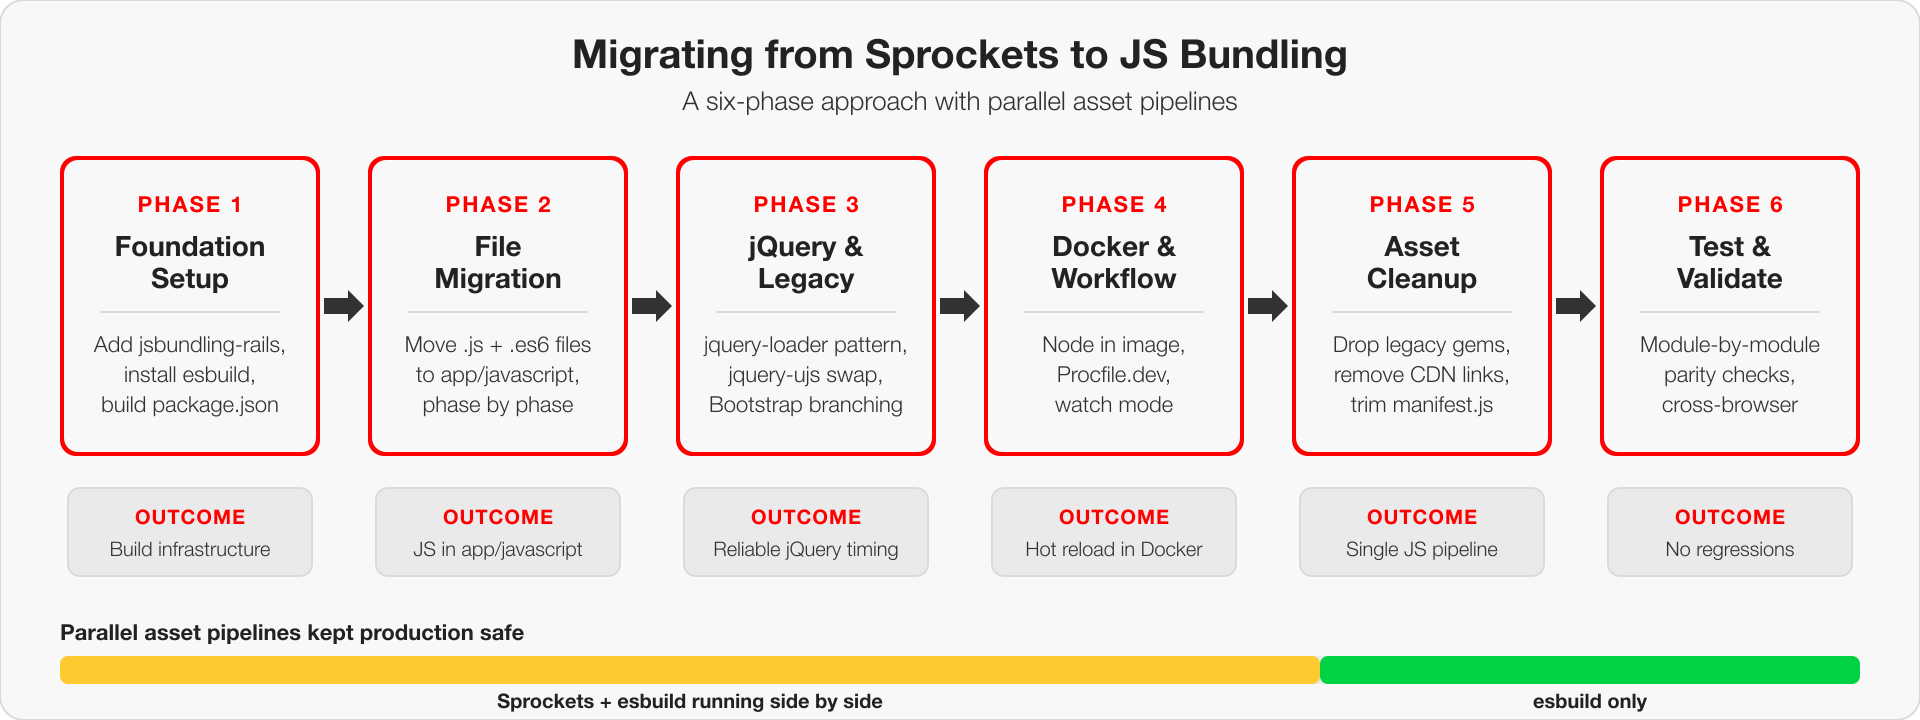
The diagram below summarizes the six phases that follow, and how the parallel pipeline period tapered into an esbuild-only setup once the migration was complete.
Phase 1: Foundation Setup
The foundation phase focused on establishing the infrastructure needed for esbuild without touching existing JavaScript files.
Setting up the build infrastructure first meant we could test that esbuild actually worked in our specific environment including
Docker, Rails asset pipeline integration, and development workflow. If the build system didn’t work properly, we would find out immediately
rather than discovering fundamental infrastructure problems after we’d already migrated files.
Adding jsbundling-rails Gem
First, we added jsbundling-rails to our Gemfile and generated the initial setup:
# Gemfile
gem "jsbundling-rails"
bundle install
./bin/rails javascript:install:esbuild
Creating the Initial Package.json Structure
We started with a minimal package.json and progressively added dependencies:
{
  "name": "app",
  "private": true,
  "scripts": {
    "build": "esbuild app/javascript/*.* --bundle --sourcemap --format=iife --outdir=app/assets/builds --public-path=/assets"
  }
}
Adding esbuild as Development Dependency
{
  "name": "app",
  "private": true,
  "devDependencies": {
    "esbuild": "^0.25.6"
  },
  "scripts": {
    "build": "esbuild app/javascript/*.* --bundle --sourcemap --format=iife --outdir=app/assets/builds --public-path=/assets"
  }
}
Front-loading All JavaScript Dependencies
Rather than adding dependencies incrementally, we added all required packages upfront to avoid mid-migration dependency issues. Here’s how we determined which dependencies to add to our package.json:
1. Audit Your Layout Files for CDN Links
Look for <script src="https://..."> tags to identify externally loaded libraries:
<!-- Found in app/views/layouts/application.html.erb -->
<script src="https://code.jquery.com/jquery-3.7.1.min.js"></script>
<script src="https://cdnjs.cloudflare.com/ajax/libs/popper.js/1.16.0/umd/popper.min.js"></script>
<script src="https://cdn.jsdelivr.net/npm/flatpickr"></script>
2. Check Your Sprockets Manifests
Review app/assets/javascripts/application.js for //= require statements:
//= require jquery
//= require bootstrap
//= require flatpickr
3. Search Your Codebase for Global Variable Usage Use grep to find library-specific globals:
grep -r "jQuery\|\\$\\." app/  # Find jQuery usage
grep -r "flatpickr\|bootstrap" app/  # Find other library usage
4. Review Your Ruby Gems
Check your Gemfile for -rails gems that wrap JS libraries:
gem "jquery-rails"        # Indicates jQuery dependency
gem "bootstrap-sass"      # Indicates Bootstrap dependency
5. Version Matching Strategy Match existing CDN/gem versions exactly first, then upgrade as a separate step after migration works.
{
  "name": "app",
  "private": true,
  "dependencies": {
    "jquery": "^3.7.1",
    "bootstrap": "4.4.1",
    "popper.js": "1.16.0",
    "flatpickr": "^4.6.13",
    "bootstrap-select": "^1.13.18"
  },
  "devDependencies": {
    "esbuild": "^0.25.6"
  },
  "scripts": {
    "build": "esbuild app/javascript/application-esbuild.js --bundle --sourcemap --format=iife --outfile=app/assets/builds/application-bundled.js"
  }
}
Key Decision: We chose specific versions that matched our existing CDN dependencies to ensure compatibility.
With npm packages installed, we could remove CDN links from our layout files:
Before (CDN approach):
<!-- app/views/layouts/application.html.erb -->
<link rel="stylesheet" href="https://cdn.jsdelivr.net/npm/flatpickr/dist/flatpickr.min.css">
<script src="https://code.jquery.com/jquery-3.7.1.min.js"></script>
<script src="https://cdnjs.cloudflare.com/ajax/libs/popper.js/1.16.0/umd/popper.min.js"></script>
After (esbuild approach):
<!-- Dependencies now bundled in application.js -->
<%= javascript_include_tag "application", "data-turbo-track": "reload" %>
This eliminated external dependencies and improved performance by reducing HTTP requests and enabling better caching control.
Setting Up the Entry Point
Created the initial JavaScript entry point that would eventually replace our Sprockets bundle:
// app/javascript/application-esbuild.js
// Entry point for the build script in your package.json

// Import jQuery and make it available globally
import $ from "jquery";
window.jQuery = $;
window.$ = $;

// Import Popper.js (required by Bootstrap 4)
import Popper from "popper.js";
window.Popper = Popper;

// Import Bootstrap
import "bootstrap";

// Import Flatpickr
import flatpickr from "flatpickr";
window.flatpickr = flatpickr;

// Import bootstrap-select
import "bootstrap-select";
Critical Decision: We maintained global variable assignments (window.$ = $) to ensure compatibility with existing legacy code that expected these globals.
Configuring the Asset Pipeline Integration
Updated the Sprockets manifest to include esbuild output:
// app/assets/config/manifest.js
//= link_tree ../images
//= link application-bootstrap4.css
//= link_directory ../stylesheets .css
//= link bootstrap-select.min.js
//= link_tree ../builds  // Added this line
Key Integration Point: The //= link_tree ../builds line is crucial because it tells Sprockets to include all files from the app/assets/builds/ directory in the asset pipeline. This is where esbuild outputs the bundled JavaScript file (as configured in the package.json --outfile=app/assets/builds/application-bundled.js). Without this line, Rails wouldn’t know about the esbuild-generated JavaScript and couldn’t serve it to browsers.
Setting Up Parallel Asset Pipeline
We added JavaScript includes to layouts for testing while keeping the existing Sprockets system running. “Keeping Sprockets” meant two things: first, Sprockets continued to handle all non-JavaScript assets (CSS, images, fonts) and serve as the overall asset pipeline coordinator; second, the old Sprockets-managed JavaScript bundle (application.js) remained functional alongside the new esbuild-managed bundle (application-bundled.js), allowing us to test by switching between them:
<!-- app/views/layouts/application.html.erb -->
<%= javascript_include_tag "application", "data-turbo-track": "reload", type: "module" %>
Docker Integration for Development
Updated Dockerfile to handle npm dependencies:
# Install Node.js and npm first (before copying files)
RUN curl -fsSL https://deb.nodesource.com/setup_18.x | bash - && \
    apt-get install -y nodejs
RUN node -v && npm -v

# Copy dependency files first for better Docker caching
COPY Gemfile* /code/
COPY package*.json /code/

# Install Ruby dependencies
RUN bundle install

# Install JavaScript dependencies
RUN npm install

# Copy all the application's files into the /code directory
COPY . /code

# Build JavaScript assets
RUN npm run build
Updated development startup scripts to include JavaScript asset building alongside Rails server startup.
Development Process Setup
Created Procfile.dev for concurrent Rails and esbuild processes:
# Procfile.dev
web: env RUBY_DEBUG_OPEN=true bin/rails server
js: npm run build -- --watch
Phase 2: The Great File Migration
Once our foundation was solid, we began the systematic migration of JavaScript files from the Sprockets world to the esbuild world. This phase was broken into various sub-phases to manage complexity and validate functionality at each step.
Phase 2a: Basic Utility Files
We started with simple, standalone files that had minimal dependencies:
// Files migrated in Phase 2a:
// app/javascript/extensions.js
// app/javascript/safari_datepicker_fix.js
// app/javascript/chrome_datapicker_fix.js
Key Learning: These files required no changes beyond moving location - they were already using modern JavaScript patterns.
Phase 2b: Application Logic and Business Rules
Next, we moved files containing business logic and form handling:
// Files migrated in Phase 2b:
// app/javascript/file_upload.js
// app/javascript/user_form.js
Example Migration - users.js:
// Previously loaded via Sprockets directive: //= require users
// Now imported as ES6 module in app/javascript/application.js:
// import('./users.js');

let setupUserEvents = function () {
  $("a[data-delete-unpaid-user]").click(function (event) {
    $("a[data-delete-unpaid-user-confirm]").attr("href", $(this).attr("href"));
    $("#delete_unpaid_associate_modal").modal("show");
    event.preventDefault();
  });

  $("input[data-user-role-toggle]").change(function () {
    let action = $(this).prop("checked") ? "add" : "remove";
    $("#confirm_role_change_action").text(action);
    // ... rest of function logic
  });
};

// Make globally accessible for .js.erb files
window.setupUserEvents = setupUserEvents;
Phase 2c: Complex Business Forms
The most complex files were migrated last:
// Files migrated in Phase 2c:
// app/javascript/user_worklist.js
// app/javascript/user_services_form.js
Some of the reasons that made these files particularly complex were:
- Multiple AJAX interactions - Both files heavily used
$.ajax()calls for dynamic form submissions without page refreshes - Complex DOM manipulation - Extensive jQuery selectors and event handlers for form interactions
- State management - Managing form state, pagination, sorting, and filtering logic
- Global function dependencies - Required multiple functions to be globally accessible for Rails
.js.erbintegration
Phase 2d: The ES6 Controller Migration
This was the largest single migration step - moving all Stimulus-style controllers:
Before (.es6 files in app/assets/javascripts):
app/assets/javascripts/controllers/
├── aria_checked_controller.es6
└── hr/pagination_controller.es6
After (.js files in app/javascript):
app/javascript/controllers/
├── aria_checked_controller.js
└── hr/pagination_controller.js
Simple File Extension Migration:
A major advantage in our case was that all our .es6 files contained vanilla JavaScript that was already compatible with modern browsers. This meant we could simply rename the files from .es6 to .js without any code changes:
# Our migration was this simple:
mv aria_checked_controller.es6 aria_checked_controller.js
mv hr/pagination_controller.es6 hr/pagination_controller.js
# ... and so on
Example Controller - No Code Changes Needed:
// FROM: app/assets/javascripts/controllers/aria_checked_controller.es6
// TO: app/javascript/controllers/aria_checked_controller.js
// (Content identical - just file extension and location changed)

class AriaCheckedController {
  constructor(fieldset) {
    this.fieldset = fieldset;
    this.connect();
  }

  connect() {
    this.updateState();
    this.listen();
  }

  listen() {
    this.listenToInputs();
  }

  listenToInputs() {
    this.inputs.forEach((input) => {
      input.addEventListener("change", () => this.updateState());
    });
  }

  updateState() {
    this.radioLabels.forEach((label) => (label.ariaChecked = "false"));
    this.checkedLabels.forEach((label) => (label.ariaChecked = "true"));
  }

  // ... rest of controller
}

// Export for global access (needed for Rails .js.erb files)
window.AriaCheckedController = AriaCheckedController;
Our Lucky Break:
Since our .es6 files were essentially vanilla JavaScript with ES6 classes and modern syntax that browsers already supported, the migration was purely mechanical - just moving files and updating import statements.
If Code Changes Were Needed:
Had our ES6 code contained incompatible syntax or used ES6 modules extensively like the example shown below:
// BEFORE (.es6 file with ES6 modules):
import { SomeUtility } from "./utilities"; // ← ES6 import syntax

export class MyController {
  // ← ES6 export syntax
  // ES6 syntax that needs transpilation
  async handleClick() {
    const result = await fetch("/api/data");
    const data = await result.json();
    // ...
  }
}
We would have needed to implement a transpilation solution using either:
- esbuild’s built-in transpilation with appropriate target settings (
--target=es2017) - Babel integration for more complex transformations via plugins like
esbuild-plugin-babel
This would have added complexity to the build process but kept our code more modern and maintainable.
Managing Import Dependencies in application-esbuild.js
As we migrated files, we updated our entry point to import them:
// app/javascript/application-esbuild.js progression

import("./extensions.js");
import("./safari_datepicker_fix.js");
import("./chrome_datepicker_fix.js");

import("./aria_checked_controller.js");
import("./hr/pagination_controller.es6");
import("./user_worklist.js");
import("./user_services_form.js");
Critical Pattern: Global Function Accessibility
A key challenge was maintaining global function access for Rails .js.erb files:
// Pattern we used throughout migration:

// Modern ES6 approach (preferred):
export function setupuserTableEvents() {
  /* ... */
}

// But also global assignment (necessary for Rails):
window.setupuserTableEvents = setupuserTableEvents;
Why This Was Necessary:
Rails .js.erb files expect functions to be globally accessible:
<!-- app/views/users/edit.js.erb -->
$('#users_table').replaceWith('<%= j render(partial: "users/users_table") %>')
setupuserTableEvents()  <!-- This expects global function -->
Module-wise Testing Strategy
While we followed the file migration phases described above, we also implemented a module-wise testing approach to validate functionality incrementally. This required creating multiple temporary JavaScript bundles so we could test incremental changes by moving only specific parts of the app to jsbundling, testing that, while the rest of the app continued being served by the old asset pipeline:
- application.js - Original Sprockets bundle (unchanged during migration)
- application-bundled.js - Initial esbuild output file containing new dependencies like jQuery, Bootstrap (later renamed to application.js)
- application-modern.js - Temporary Sprockets bundle for testing during migration (later removed)
Creating the Hybrid JavaScript Bundle (application-modern.js):
// app/assets/javascripts/application-modern.js
// This is a manifest file for the modern JavaScript setup with esbuild
// It excludes jQuery since that's loaded from the bundled file
//
//= require users
//= require extensions
//= require safari_datepicker_fix
//= require_tree ./controllers
//= require_tree ./helpers
//= require_tree ./services
//= require_tree ./timecards
//= require_tree ./vsr

// ... rest of application logic
Layout-level Testing: We could then test specific modules by modifying which JavaScript bundle the layouts loaded:
<!-- app/views/layouts/application.html.erb -->
<!-- BEFORE: Original Sprockets + CDN approach -->
<%= javascript_include_tag "application" %>
<script src="https://code.jquery.com/jquery-3.5.1.min.js"></script>
<script src="https://cdn.jsdelivr.net/npm/popper.js@1.16.0/dist/umd/popper.min.js"></script>

<!-- AFTER: Modern esbuild + Sprockets hybrid approach -->
<%= javascript_include_tag "application-bundled" %>  <!-- esbuild dependencies -->
<%= javascript_include_tag "application-modern" %>   <!-- core app logic -->
Layout-specific Testing: Different layouts could use different JavaScript bundles:
<!-- Test User module: app/views/layouts/user.html.erb -->
<%= javascript_include_tag "application-bundled" %>
<%= javascript_include_tag "application-modern" %>

<!-- Keep main app on old system: app/views/layouts/application.html.erb -->
<%= javascript_include_tag "application" %>
<!-- CDN scripts... -->
Benefits of Module-wise Testing:
- Risk Mitigation: Issues isolated to specific functionality areas
- Faster Debugging: Easier to identify which JavaScript caused issues
- Stakeholder Confidence: Could demonstrate working functionality module by module
- Incremental Validation: Each module tested thoroughly before moving to next
This approach was particularly valuable for our client since different modules had different user bases and usage patterns.
Results of Phase 2
After this phase, we had:
- JavaScript files migrated to esbuild
- All
.es6extensions converted to.js - Global function access preserved for Rails integration
- Organized file structure (
controllers/,services/,helpers/) - Module-wise testing capability through parallel layouts
- No breaking changes to existing functionality
Phase 3: Solving jQuery and Legacy Dependencies
Phase 3 addressed the most challenging aspect of the migration: ensuring jQuery and other dependencies were available when legacy code expected them, while managing multiple Bootstrap versions across different layouts.
The jquery-loader.js Solution
Our biggest challenge was timing - ensuring jQuery was globally available before other scripts tried to use it.
We initially tried a couple of different approaches: Before (problematic timing):
// app/javascript/application.js - BROKEN approach
import $ from "jquery";
window.jQuery = $;
window.$ = $;

// These imports might execute before $ is globally available
setTimeout(() => {
  import("./users.js"); // Might fail if $ not ready
  import("./controllers/nav_tabs_controller.js");
}, 0);
Both approaches had problems. We solved those with a custom loader:
// app/javascript/jquery-loader.js
import $ from "jquery";

// Attach to window for legacy plugins
window.jQuery = $;
window.$ = $;

// Resolved promise to guarantee jQuery is globally available before dependent code executes
export const jqueryReady = Promise.resolve($);

/**
 * Helper function to ensure jQuery is ready before executing code.
 * @param {Function} callback - An async or sync function that receives the $ object.
 * @returns {Promise<void>} A promise that resolves when the callback is done.
 */
export async function withJquery(callback) {
  const jq = await jqueryReady;
  return callback(jq);
}
After (guaranteed timing):
// app/javascript/application.js - WORKING approach
import { withJquery } from "./jquery-loader.js";

withJquery(async ($) => {
  // All imports happen after jQuery is confirmed available
  await import("./users.js");
  await import("./nav_tabs_controller.js");
  await import("./pagination_controller.js");
  // ... all other imports
});
Switching from Rails UJS to jQuery UJS
We were using the jquery-rails gem, which made our AJAX requests work. However, as we were integrating JS bundling, we took it as an opportunity to get rid of the gem and take a step further to drop jquery-ujs altogether and replace it with rails/ujs.
As we integrated rails/ujs, we discovered compatibility issues with it and switched back to the jQuery-based version:
Before (@rails/ujs - Complex event handling):
// Complex event handling for @rails/ujs
$(document).on("ajax:before", "#add_line_item", function (e) {
  var $link = $(this);
  var baseUrl = $link.attr("href").split("&count=")[0];
  $link.attr("href", baseUrl + "&count=" + ++window.line_item_count);
});

$(document).on("ajax:success", "#add_line_item", function (e) {
  // In @rails/ujs, the response is in e.detail[0]
  var response = e.detail[0];
  // Complex response parsing logic...
});
After (jquery-ujs - Simple and familiar):
// Much simpler with jquery-ujs
$("#add_line_item")
  .on("ajax:beforeSend", function (e, data, status, xhr) {
    status.url = status.url + "&count=" + ++window.line_item_count;
  })
  .on("ajax:success", function (e, data, status, xhr) {
    $("#line_items tbody").append(xhr.responseText);
  })
  .on("ajax:error", function (e, xhr, status, error) {
    $("#line_items tbody").append("<p>ERROR</p>");
  });
Package change:
{
  "dependencies": {
    "@rails/ujs": "^7.1.3-4", // ← Removed
    "jquery-ujs": "^1.2.3" // ← Added
  }
}
The reason we did not invest too much effort into making rails/ujs work with our existing forms was that we wanted to remain focused on migrating to JS bundling, and rewriting our forms to work with rails/ujs seemed like a big enough deviation from our original goal.
Bootstrap Version Detection and Conditional Loading
Our application used different Bootstrap versions across layouts, requiring conditional loading:
Layout Detection Strategy:
<!-- app/views/layouts/application.html.erb (Bootstrap 2) -->
<html lang="en" data-bootstrap-version="2">

<!-- app/views/layouts/application_bootstrap4.html.erb (Bootstrap 4) -->
<html lang="en" data-bootstrap-version="4">
Conditional Bootstrap Loading:
// app/javascript/application.js
// Conditionally import Bootstrap based on layout
if (document.documentElement.getAttribute("data-bootstrap-version") === "4") {
  // Import Bootstrap 4 for modern layouts
  import("bootstrap");
} else {
  // Import custom Bootstrap 2 modal for legacy layouts
  import("bootstrap2");
}
Bootstrap Version Compatibility
The conditional loading handled different Bootstrap versions across layouts without requiring separate modal implementations.
Managing Vendor Library Integrations
Flatpickr jQuery Plugin:
// app/javascript/application.js
import flatpickr from "flatpickr";
window.flatpickr = flatpickr;

// Add flatpickr as a jQuery plugin for legacy code compatibility
$.fn.flatpickr = function (config) {
  return this.each(function () {
    flatpickr(this, config);
  });
};
Global Function Pattern for Rails Integration
Many functions needed global access for .js.erb files:
// Pattern used throughout the application
window.capturePaginationAndSortLinks = function () {
  $("a.page-link").click(function (e) {
    e.preventDefault();
    const page = $(this)
      .attr("href")
      .match(/page=(\d*)/)[1];
    $("input[data-page-field]").val(page);
    submitForm();
  });
};

window.clearSupervisor = function () {
  // Clear supervisor data logic
};

// Multiple other global functions...
Results of Phase 3
After this phase, we had:
- Reliable jQuery loading with proper timing
- Simplified AJAX handling with jquery-ujs
- Multi-Bootstrap version support
- All vendor libraries properly integrated
- Global function access maintained for Rails
- No breaking changes to existing jQuery-dependent code
Key Insight: The jquery-loader pattern proved essential for any Rails application with significant jQuery dependencies, ensuring consistent timing and global availability.
Phase 4: Docker and Development Workflow Changes
The migration to esbuild required significant changes to our Docker-based development environment and build processes to support both npm dependencies and JavaScript bundling.
Key Additions:
- Node.js installation - Added official Node.js APT repository
- Package.json copying - Copy npm dependency files for caching
- JavaScript dependencies - Install npm packages
- Asset building - Build JavaScript assets during image creation
Development Server Integration
We added JavaScript asset management to our development startup script:
# Ensure npm packages are installed (in case of volume mount)
echo "Installing npm packages..."
npm install

# Clean precompiled assets to ensure fresh builds are served
echo "Cleaning precompiled assets..."
bundle exec rails assets:clobber

# Build JavaScript assets in background
echo "Starting JavaScript build watcher..."
npm run build:watch &
Why These Additions Were Necessary:
- Volume mounts - In Docker development,
node_modulesmight not persist, requiringnpm installon startup - Asset conflicts - Rails asset clobber prevents conflicts between Sprockets and esbuild outputs
- Hot reloading - Background
build:watchenables instant JavaScript updates during development
Build Script Configuration
Created separate build configurations for development and production:
{
  "scripts": {
    "build:watch": "esbuild app/javascript/application.js --bundle --sourcemap --format=iife --outfile=app/assets/builds/application.js --watch=forever",
    "build": "esbuild app/javascript/application.js --bundle --sourcemap --format=iife --outfile=app/assets/builds/application.js --minify"
  }
}
Development vs Production Differences:
| Feature | Development (build:watch) |
Production (build) |
|---|---|---|
| Watch mode | --watch=forever |
No watching |
| Minification | No minification | --minify |
| Source maps | --sourcemap |
--sourcemap |
| Purpose | Hot reloading during development | Optimized production bundle |
Docker Compose Integration
Our docker-compose.yml worked seamlessly with the JavaScript build integration - no changes were needed to the volume configuration since the npm dependencies and builds happen inside the container.
Development Workflow Impact
Before esbuild:
# Simple workflow
docker-compose up
# Rails server starts immediately
After esbuild:
# Enhanced workflow
docker-compose up
# Container runs: npm install → build:watch → rails server
# JavaScript changes automatically trigger esbuild rebuilds
# Hot reloading works seamlessly
Asset Serving Strategy
Development:
- esbuild outputs to
app/assets/builds/application.js - Rails serves via standard asset pipeline
- Changes trigger immediate rebuilds
Production:
- Assets precompiled during Docker build
- Minified bundles served with fingerprinting
- No runtime JavaScript compilation needed
Results of Docker Integration
After these changes, we achieved:
- Seamless development experience - No manual JavaScript building required
- Hot reloading - JavaScript changes reflected immediately in browser
- Production readiness - Minified assets built during deployment
- Developer onboarding - Single
docker-compose upcommand works for new developers - No environment inconsistencies - Same Node.js version across all environments
Key Insight: Docker layer optimization and proper build sequencing were crucial for maintaining fast development cycles while supporting the new JavaScript toolchain.
Phase 5: Asset Pipeline Cleanup
Once our esbuild system was working reliably, we systematically cleaned up the legacy Sprockets configuration and removed obsolete JavaScript files. This cleanup phase was critical for preventing confusion and reducing maintenance burden.
Updating manifest.js Configuration
The Sprockets manifest needed significant cleanup to remove JavaScript references:
Before (including all JavaScript):
// app/assets/config/manifest.js
//= link_tree ../images
//= link_directory ../javascripts .js
//= link_directory ../stylesheets .css
//= link bootstrap-select.min.js
//= link_tree ../builds
After (JavaScript removed from Sprockets):
// app/assets/config/manifest.js
//= link_tree ../images
//= link_directory ../stylesheets .css
//= link_tree ../builds
Key Changes:
- Removed
//= link_directory ../javascripts .js- No more Sprockets JavaScript processing - Removed
//= link bootstrap-select.min.js- Now bundled via npm - Kept
//= link_tree ../builds- esbuild output served by Sprockets
Removing Sprockets JavaScript Processing
Updated production environment to stop JavaScript compression:
Before (Sprockets handling JavaScript):
# config/environments/production.rb
# Compress JavaScripts and CSS.
config.assets.js_compressor = :terser
After (esbuild handling JavaScript):
# config/environments/production.rb
# Compress CSS.
# JavaScript is now handled by esbuild, not Sprockets
This eliminated the need for server-side JavaScript minification since esbuild handles it during the build process.
Gem Dependencies Cleanup
Removed obsolete Ruby gems from Gemfile:
Before:
# Gemfile
gem "jquery-rails"        # ← Removed: jQuery now via npm
gem "coffee-rails"        # ← Removed: No CoffeeScript files
gem "terser"              # ← Removed: esbuild handles minification
gem "babel-transpiler"    # ← Removed: esbuild handles transpilation
After:
# Gemfile
gem "jsbundling-rails"    # ← Only JavaScript-related gem needed
Benefits of Gem Cleanup:
- Simplified Bundler dependencies - 4 fewer gems to manage
- Faster bundle install - Reduced dependency resolution time
- Cleaner production environment - Easier management of JavaScript processors
- Reduced attack surface - Fewer dependencies to maintain and update
Layout File Simplification
Layout files became much cleaner without CDN dependencies:
Before (multiple script tags):
<!-- app/views/layouts/application.html.erb -->
<script src="https://code.jquery.com/jquery-3.7.1.min.js"></script>
<script src="https://cdn.jsdelivr.net/npm/popper.js@1.16.0/dist/umd/popper.min.js"></script>
<script src="https://cdn.jsdelivr.net/npm/bootstrap@4.4.1/dist/js/bootstrap.min.js"></script>
<link rel="stylesheet" href="https://cdn.jsdelivr.net/npm/flatpickr/dist/flatpickr.min.css">
<script src="https://cdn.jsdelivr.net/npm/flatpickr"></script>

<%= javascript_include_tag "application", "data-turbo-track": "reload" %>
After (single bundled script):
<!-- app/views/layouts/application.html.erb -->
<%= javascript_include_tag "application", "data-turbo-track": "reload" %>
CDN Dependency Consolidation
Complete elimination of external JavaScript CDNs:
| Library | Before | After |
|---|---|---|
| jQuery | CDN link | npm package → bundled |
| Bootstrap | CDN link | npm package → bundled |
| Popper.js | CDN link | npm package → bundled |
| Flatpickr | CDN link | npm package → bundled |
| Bootstrap-select | CDN link | npm package → bundled |
Benefits of CDN Consolidation:
- Improved Performance - Single HTTP request instead of 5-6 separate CDN requests
- Better Caching - All JavaScript served from same domain with consistent cache headers
- Version Control - All dependencies locked to specific versions in package.json
- Offline Development - No external dependencies required for local development
- Security - No third-party CDN dependencies that could be compromised
Results of Asset Pipeline Cleanup
After this cleanup phase, we achieved:
- Single source of truth - esbuild handles all JavaScript, Sprockets handles CSS/images
- Simplified configuration - Removed 4 gems and multiple CDN dependencies
- Faster builds - No duplicate JavaScript processing
- Cleaner codebase - legacy files removed from version control
- Better security - No external CDN dependencies
- Easier maintenance - One build system to understand and debug
Key Insight: The cleanup phase proved as important as the migration itself. Having both systems running parallel during development was helpful for validation, but cleaning up promptly after migration prevented confusion and technical debt accumulation.
Phase 6: Testing and Validation
The testing and validation phase was critical for ensuring our migration didn’t break any existing functionality. We followed a systematic approach to catch issues early and validate that our new esbuild setup worked identically to the old Sprockets system.
Ensuring Functionality Parity
Module-wise Testing Approach:
Rather than testing the entire application at once, we tested functionality module by module using our parallel asset pipeline setup:
<!-- Testing different modules with different JavaScript bundles -->

<!-- app/views/layouts/user.html.erb - User module testing -->
<%= javascript_include_tag "application-bundled" %>  <!-- esbuild dependencies -->
<%= javascript_include_tag "application-modern" %>   <!-- core app logic -->

<!-- app/views/layouts/application.html.erb - Main app (control group) -->
<%= javascript_include_tag "application" %>          <!-- Original Sprockets -->
Testing Methodology:
- Side-by-side comparison - Open same page in two browser tabs with different JavaScript bundles
- AJAX functionality verification - Ensure all dynamic features worked identically
- Cross-browser testing - Validate across Chrome, Firefox.
Discovered Issues and Fixes During Testing
Issue 1: Rails UJS Compatibility
During initial testing, we found that AJAX functionality on our forms (originally written for jquery-ujs) was no longer working and behaved differently:
Problem discovered:
// This worked with rails/ujs but not with jquery-ujs
$("#add_line_item").on("ajax:success", function (e, data, status, xhr) {
  $("#line_items tbody").append(xhr.responseText);
});
Root cause: Different event object structure between @rails/ujs and jquery-ujs
Solution implemented:
We stopped using rails/ujs, reverted to jquery-ujs, and rewrote the code as follows:
$(document).on("ajax:success", "#add_line_item", function (e) {
  var response = e.detail[0];
  var responseText;

  if (typeof response === "string") {
    responseText = response;
  } else if (response.body) {
    responseText = response.body.innerHTML;
  } else if (response.responseText) {
    responseText = response.responseText;
  }

  $("#line_items tbody").append(responseText);
});
Issue 2: Variable Declaration Errors
esbuild’s stricter parsing caught undeclared variables:
Problem discovered:
// This worked in Sprockets (loose mode) but failed in esbuild
triggerTarget(trigger){
  targetName = this.triggerFor(trigger) // ← Undeclared variable
  return this.page.querySelector(`[data-nav-tabs-name="${targetName}"]`)
}
Solution implemented:
// Fixed version with proper variable declaration
triggerTarget(trigger){
  let targetName = this.triggerFor(trigger) // ← Properly declared
  return this.page.querySelector(`[data-nav-tabs-name="${targetName}"]`)
}
Production Deployment Considerations
Pre-deployment Validation:
- Asset compilation test - Verified assets built successfully in production environment
- CDN integration - Confirmed bundled assets served correctly from Rails asset pipeline
- Caching validation - Ensured proper cache busting with asset fingerprinting
Lessons Learned and Gotchas
Our migration taught us several important lessons about moving from Sprockets to modern JavaScript bundling. Here are the key challenges we encountered and practical solutions that saved us significant time and debugging effort.
Common Pitfalls and How We Solved Them
Pitfall 1: Assuming All ES6 Files Need Code Changes
What we initially thought:
“All our .es6 files will need significant refactoring to work with esbuild”
Reality:
Our .es6 files were mostly vanilla JavaScript with ES6 syntax that worked perfectly in modern browsers.
Solution:
# This simple approach worked for 30+ files:
mv file.es6 file.js
# No code changes needed
Lesson: Always audit your existing code first. Don’t assume you need complex transpilation setups.
Pitfall 2: Trying to Import Everything as ES6 Modules
What we initially tried:
// app/javascript/application.js - WRONG approach
import { setupuserTableEvents } from "./users.js";
import { calculateTotal } from "./line_items.js";
// ... trying to make everything modular
Problem: Rails .js.erb files expect global functions, not ES6 module exports.
Reality-based solution:
// app/javascript/users.js - WORKING approach
function setupuserTableEvents() {
  // Implementation here
}

// Make available globally for Rails integration
window.setupuserTableEvents = setupuserTableEvents;
Lesson: In Rails applications, you often need to maintain global function access alongside modern module patterns.
Pitfall 3: Underestimating jQuery Timing Issues
What we initially thought: “jQuery should just work if we import it first”
What actually happened:
// This caused random failures
import $ from "jquery";
window.$ = $;

import("./users.js"); // Sometimes executed before $ was ready
Solution that actually works:
// app/javascript/jquery-loader.js
import $ from "jquery";
window.jQuery = $;
window.$ = $;

export const jqueryReady = Promise.resolve($);

export async function withJquery(callback) {
  const jq = await jqueryReady;
  return callback(jq);
}

// app/javascript/application.js
import { withJquery } from "./jquery-loader.js";

withJquery(async ($) => {
  // All imports happen after jQuery is confirmed available
  await import("./users.js");
  await import("./line_items.js");
  // ...
});
Lesson: Asynchronous imports require explicit dependency management. Don’t rely on import order for timing-sensitive dependencies.
jQuery Compatibility Challenges
Challenge 1: Different UJS Event Structures
Problem: @rails/ujs and jquery-ujs fire events with different data structures.
Symptoms:
// This worked with Sprockets + jquery-ujs
$("#form").on("ajax:success", function (e, data, status, xhr) {
  console.log(xhr.responseText); // ← Undefined with @rails/ujs
});
Solution: Just switch to jquery-ujs for consistency:
{
  "dependencies": {
    "jquery-ujs": "^1.2.3"
  }
}
Challenge 2: Plugin Integration Patterns
Problem: Some jQuery plugins expect specific global setup.
Example with Flatpickr:
// WRONG - Doesn't make it available for legacy code
import flatpickr from "flatpickr";

// CORRECT - Maintains both modern and legacy access
import flatpickr from "flatpickr";
window.flatpickr = flatpickr;

// Add as jQuery plugin for legacy compatibility
$.fn.flatpickr = function (config) {
  return this.each(function () {
    flatpickr(this, config);
  });
};
Import Order Dependencies
Challenge: Bootstrap + Popper.js Dependency Chain
Problem discovered:
// This order caused "Popper is not defined" errors
import "bootstrap";
import Popper from "popper.js";
Correct order:
// Popper must be available before Bootstrap imports
import Popper from "popper.js";
window.Popper = Popper;

import "bootstrap";
Lesson: Some libraries have implicit global dependencies. Check the documentation and test thoroughly.
Key Takeaways
- Test early and often - Don’t wait until the end to test functionality
- Maintain compatibility layers - Global function access is often necessary
- Handle timing explicitly - Don’t rely on import order for critical dependencies
- Document decisions - Note why you chose specific patterns for future maintainers
Most Important Lesson: The biggest time-saver was creating the parallel asset pipeline system. This allowed us to test incrementally and compare behavior directly, catching issues early when they were easier to fix.
Results and Benefits
After completing our migration from Sprockets to jsbundling-rails + esbuild, the improvements exceeded our expectations across multiple dimensions. Here’s a comprehensive analysis of the tangible benefits we achieved.
Maintenance Advantages
Simplified Dependency Management:
Before (Sprockets approach):
# Gemfile - JavaScript managed via Ruby gems
gem 'jquery-rails'        # jQuery via Ruby wrapper
gem 'coffee-rails'        # CoffeeScript support
gem 'terser'              # JavaScript minification
gem 'babel-transpiler'    # ES6 transpilation

# Plus CDN links in layout files:
# <script src="https://cdn.jsdelivr.net/npm/bootstrap@4.4.1/...">
# <script src="https://code.jquery.com/jquery-3.7.1.min.js">
After (npm approach):
{
  "dependencies": {
    "jquery": "^3.7.1",
    "bootstrap": "4.4.1",
    "flatpickr": "^4.6.13"
  },
  "devDependencies": {
    "esbuild": "^0.25.6"
  }
}
Benefits:
- 4 fewer Ruby gems to maintain and update
- Single source of truth for JavaScript dependencies
- Explicit version control in package.json vs implicit CDN versions
- Offline development without CDN dependencies
Reduced Configuration Complexity:
Before (multiple configuration points):
# config/environments/production.rb
config.assets.js_compressor = :terser

# app/assets/config/manifest.js
//= link_directory ../javascripts .js
//= link bootstrap-select.min.js

# Various gem-specific configuration
After (single build configuration):
{
  "scripts": {
    "build": "esbuild app/javascript/application.js --bundle --sourcemap --format=iife --outfile=app/assets/builds/application.js --minify"
  }
}
Network Performance:
- Reduced latency: Single request vs multiple CDN requests
- Better caching: All JavaScript served from same domain with consistent cache headers
- Improved reliability: No dependency on external CDN availability
Access to Modern JavaScript Ecosystem:
// Now possible - direct npm package usage
import dayjs from "dayjs";
import axios from "axios";

// Previously required manual vendoring or gem wrappers
Infrastructure Benefits:
- Reduced CDN costs: No external JavaScript CDN dependencies
- Simplified deployment: Single asset pipeline reduces deployment complexity
Risk Reduction:
- Fewer external dependencies: Eliminates CDN availability risks
- Modern tooling: Reduces risk of legacy tool abandonment
- Industry alignment: Easier to hire developers familiar with standard JavaScript tooling
Conclusion
Some of the specific problems and solutions documented in this blog post are unique to our particular Rails application and its configuration. However, we’ve shared them in case you encounter similar challenges during your own migration. The patterns and approaches described should be adaptable to most Rails applications making this transition.
Need Help with Your JavaScript Modernization?
If you’re considering a similar migration for your Rails application or need assistance with JavaScript modernization, dependency cleanup, or build optimization, we’d be happy to help.
Whether you’re dealing with a complex legacy JavaScript codebase, evaluating different bundling approaches, or planning a gradual migration strategy, our experience with this transition can help you avoid common pitfalls and achieve a smooth modernization.
Feel free to reach out if you’d like to discuss your specific situation or explore how we can help modernize your JavaScript infrastructure .