
A Step-by-Step Guide to Upgrading Your Ruby Version


Every year, Ruby enthusiasts anticipate the December release of a new Ruby version. At the end of 2023, Ruby 3.3 was released and you can read this article to learn more about the new features and improvements it brings. This makes it a good time to start considering if your application is due for an upgrade.
Upgrading your application can sound complicated and difficult, but it doesn’t have to be. Below, we will discuss how to identify when to upgrade your Ruby version and the steps necessary to complete a smooth and successful upgrade.
Reasons to upgrade
- Performance: Each new Ruby version aims to enhance performance, providing improved execution and run times for applications.
- Bug Fixes: New Ruby versions can fix existing bugs, resolving issues from previous versions and ensuring a more stable development environment.
- Security Updates: Ruby will continue to patch security issues and keeping up with supported Ruby versions can be beneficial.
- Features: Access to new functionalities that allow developers to build more robust and efficient applications.
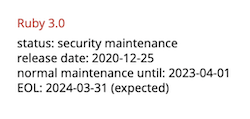
- End of life: It is important to know the end-of-life status of your current Ruby version; refer to ruby-lang.org for details. Here we can see that Ruby 3.0 is expected to be EOL at the end of March.
- Rails Compatibility: If your application runs on Rails, Rails guides recommend upgrading ruby to the latest possible version always before upgrading Rails. Refer to this compatibility chart to assess the compatibility between your Ruby version and the desired Rails version before beginning the upgrade process.
Preparing for an upgrade
-
Review the current Ruby version and decide on a targeted version. We suggest doing gradual, incremental upgrades, aiming to only upgrade to the next stable version at a time. This approach helps avoid significant changes that may pose challenges and unnecessary complexity. You can find a list of all releases here to determine what the next stable version for your application should be.
-
Understand the changes that have been introduced in the targeted version by reviewing the release notes. For example, if the targeted version is Ruby 3.3, all changes listed in the Ruby release notes for that version should be analyzed.
-
Install the targeted Ruby version using your preferred Ruby version manager.
-
We recommend setting up dual booting before fully switching to the new Ruby version. This allows running the application with both the current and targeted Ruby versions, helping to identify issues early while maintaining stability.
-
Make sure that there are tests covering the critical paths of the application. This is extremely beneficial and acts as a guide to make sure the most important parts of the application will work as expected with the new version. These tests can be automated or can also be pre-defined manual tests to be performed by a QA person.
-
Determine a workflow that will work best for your team to follow during the upgrade including deployment strategies, QA and testing. We like to create an upgrade branch for our engineers to branch off of and push changes to as the upgrade progresses. This keeps PRs small and easy to review and QA, but holds all updates necessary in one single PR acting as the upgrade branch.
Address Deprecations
One of the first steps we focus on during an upgrade at FastRuby.io is addressing all deprecation warnings present in the current version. Test coverage and the QA team can help with this step by processing all test logs and identifying the warnings.
Check out our Journey Upgrading to Ruby 3.0 article on how to enable and save deprecation warnings for Ruby. Use of this technique can be applied to applications in production with low test coverage as well.
Update Incompatible Gems
RubyGems is a great resource to review information about dependencies and their compatibility. For example, you can review the minimum required Ruby version for the Skunk gem .
As you update gems, it is best to do conservative updates using the following command:
bundle update --conservative GEMS
NOTE: If your project contains dependencies that have been forked, it will be important to review those projects and update them if available.
Update Ruby
-
Update Ruby Version: Locate any files that specify the current Ruby version and update them. Examples of these files can be
.ruby-version,Gemfile, build files andDockerif you have them. -
Update Bundler: Run
gem install bundlerto install the latest compatible version of Bundler using the updated Ruby version. -
Run bundle install: Identify what is failing and continue to fix errors until bundler installs successfully.
-
Backward compatible changes: Some changes that are needed for the new Ruby version can be applied to the previous version too, that helps by reducing the changes in the upgrade branch.
Fix the broken build
At this point, all necessary updates in the application have been made and it is time to start testing in order to see what will start failing. Continue to repeat this step, fixing each failure until all tests pass.
Conclusion
Running with the latest version of Ruby will give your application the benefits of new features and performance improvements. However, it’s not always easy to figure out the next steps of an upgrade project. Having a systematic and organized process can solve this problem and ensure that the upgrade attempt is smooth and successful while addressing all necessary pieces of the upgrade.
Are you ready to upgrade your Ruby? We can help!